es6的class

定义

通过class来定义一个类,这个与java中很相似

1
2
3
4
5
6
7
8
9
10
11
12
13
14
15
16
17
18
19
20
21
22
class Person {
// 属性
name
age = 18

// 构造方法
constructor(name, age) {
this.name = name
this.age = age
}

// 类方法
sayHi() {
console.log('hello')
console.log(`my name is ${this.name}`)
}
}

// 实例化
const p = new Person('clesbit', 20)
console.log(p)
p.sayHi()

继承

通过extends关键字来继承一个一个类,语法如下

1
2
3
4
5
6
7
8
class Person {
//属性
//构造方法
//类方法
}

class Student extends Person {
}

这里实现了Student类对Person类的继承,Student类原型链的父级是Person,其方法可以在原型链上找到。

类的静态方法与私有属性、方法

  • 类的静态方法只能通过类进行调用,而不能通过其实例对象进行调用,在类的内部也是可以调用的。其定义的语法如下
1
2
3
4
5
6
7
8
9
10
11
12
13
14
15
16
class Person {
static text = '这是类的静态属性'

static stFunc() {
console.log('这是类的静态方法')
console.log(this.text + ' | ' + '静态方法内部输出静态属性')
}
}

// 通过类名调用
console.log(Person.text)
Person.stFunc()
// 错误使用
const p = new Person()
console.log(p.text) //undefined
p.stFunc() //报错
  • 类的私有方法,私有属性只能在类当中使用,用#定义,例子如下
1
2
3
4
5
6
7
8
9
10
11
12
13
14
15
16
class Person {
#text = '我是类的私有的属性text'

#logText() {
console.log('我是类的私有方法logText!!')
console.log('使用类的私有属性' + this.#text)
}

test() {
// 调用私有的方法
this.#logText()
}
}

const p = new Person()
p.test()

在实现过程中,是没有办法通过类或者类的实例化对象进行私有方法或者私有属性的调用,私有的只能在类的内部进行调用。

寄生组合式继承

通过构造函数继承父类的属性,通过原型链继承父类的方法

1
2
3
4
5
6
7
8
9
10
11
12
13
14
15
16
17
18
19
20
21
22
23
24
25
26
27
28
29
30
// 定义父类
function Person(name) {
this.name = name
}

// 父类方法
Person.prototype.sayHi = function () {
console.log(`Hi my name is ${this.name}`)
}

/*------------------继承------------------*/

// 先继承父类的属性
function Student(name) {
Person.call(this, name) //这里的this指向的是Person
}

// 继承父类的方法
const prototype = Object.create(Person.prototype, {
constructor: {
value: Student
}
})
// 替换原型
Student.prototype = prototype
const student1 = new Student('clesbit')
console.log(student1.name)
student1.sayHi()


fetch

get请求

fetch用于发起网络请求,和项目中常用的axios相比,这个功能相对来说比较少一点,但是比较方便,因为是一个浏览器内置的api

1
2
3
4
5
6
7
8
9
10
11
12
13
14
15
16

<button id="btn">发起请求</button>
<script>
document.querySelector('#btn').addEventListener('click', async () => {
const p = new URLSearchParams({pname: '江苏省', cname: '南京市'})
// 这里fetch返回的是一个promise对象,要在前面加一个await
const res = await fetch('https://hmajax.itheima.net/api/area?' + p.toString())
if (res.status >= 200 && res.status < 300) {
// 这里调用的json方法返回的也是一个promise对象
const data = await res.json()
console.log(data)
} else {
alert('error' + res.status)
}
})
</script>

这里定义了一个按钮,并且给它绑定了点击事件,回调函数是一个异步函数

提交formdata类型的数据

tips:提交formdata的时候会默认设置请求头

1
2
3
4
5
6
7
8
9
10
11
12
13
14
15
16
<input type="file" class="upload">
<img src="" alt="" class="showImg">
<script>
document.querySelector('.upload').addEventListener('change', async function () {
// 获取图片对象
const img = this.files[0]
const data = new FormData()
data.append('img', img)
const res = await fetch('https://hmajax.itheima.net/api/uploadimg', {
method: 'POST',
body: data
})
const resData = await res.json()
document.querySelector('.showImg').src = resData.data.url
})
</script>

提交json

使用fetch提交json数据的时候,得自己指定请求头,告诉服务器请求中body的数据类型

1
2
3
4
5
6
7
8
9
10
11
12
13
14
15
16
17
18
<h3>提交json类型的数据</h3>
<button class="ck">提交json数据</button>
<script>
document.querySelector('.ck').addEventListener('click', async function () {
// 获取图片对象
const headers = new Headers()
headers.append('Content-type', 'application/json')
const res = await fetch('https://hmajax.itheima.net/api/register', {
method: 'POST',
headers,
body: JSON.stringify({
username: 'clesbitclesbit',
password: '055177'
}),
})
const resData = await res.json()
console.log(resData)
})

基本数据类型与引用数据类型

基本数据类型

  • string字符串
  • number数字型:整数浮点数、NAN
  • undefined未定义类型:数据未定义
  • null空类型
  • Symbol唯一类型(es6引入):表示数据是唯一的
  • boolean布尔类型:表示true 或者false

引用数据类型

引用数据类型是一个大的类,Object,里面包含基本对象、数组、方法、日期、Map对象、Set对象等。

基本数据类型与引用数据类型的区别

基本数据类型所占内存空间的大小是确定的,所以简单数据类型直接存储在内存栈当中,这个栈有先进后出的特点,一般的,当这个基本数据不再被使用的时候,会被js的垃圾回收机制自动回收掉。

引用数据类型大小是不固定的,可以联想到数组,可以动态的对数组进行CRUD
,所以引用数据类型一般存储在内存堆当中,而声明的变量仅仅是指向这个实例的一个引用地址,这个声明的变量是存储在内存栈当中的。当访问一个引用数据类型的时候,会先到内存栈中寻找对应的引用地址,再根据这个引用地址找到内存堆中对应的实例。
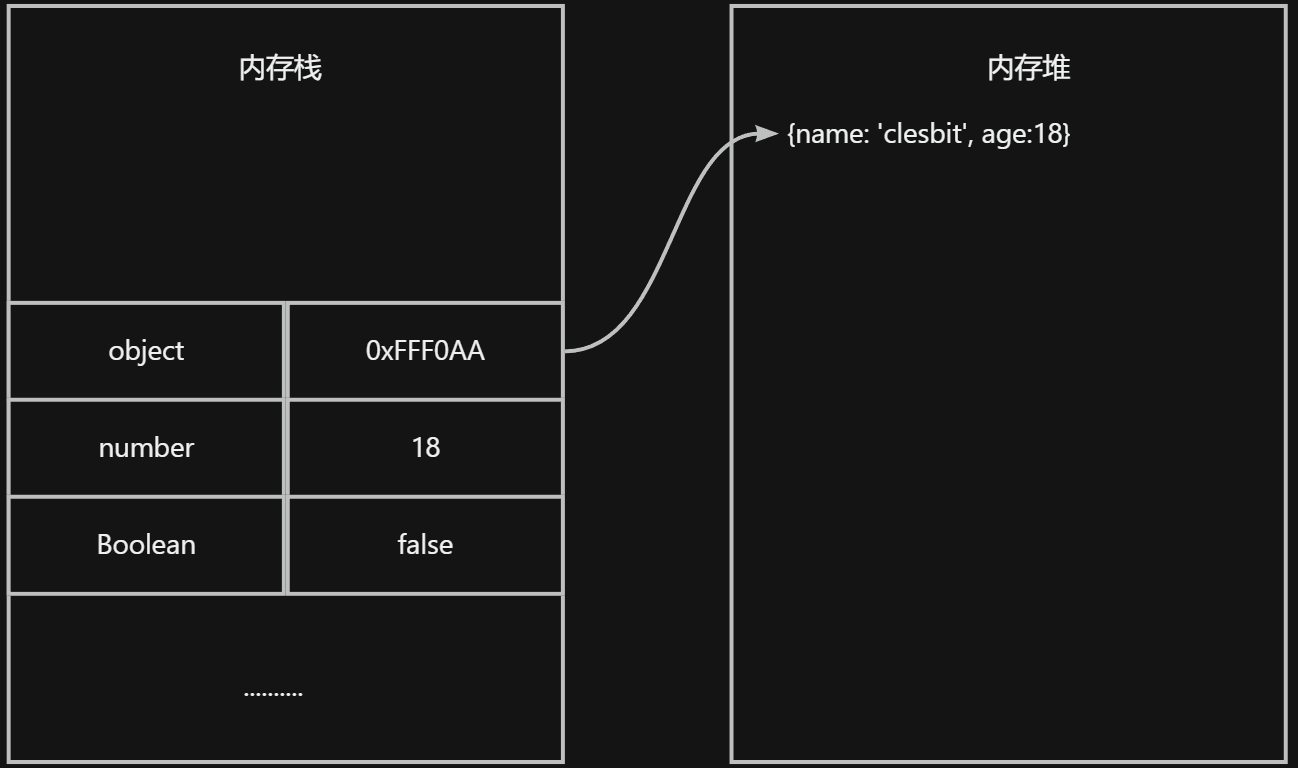
赋值运算符

当给基本数据类型进行一个复制操作的时候,会直接进行一个数据的拷贝并且存储。会开辟一个新的内存空间,将拷贝的数据放到内存栈当中。
同样的,当将一个对象的引用赋值给另一个变量的时候,也会开辟一个新的内存空间,将存储对象的引用放到内存栈当中,他不会在内存堆中开辟新的内存空间,还是指向原来的对象,因为是同一个引用
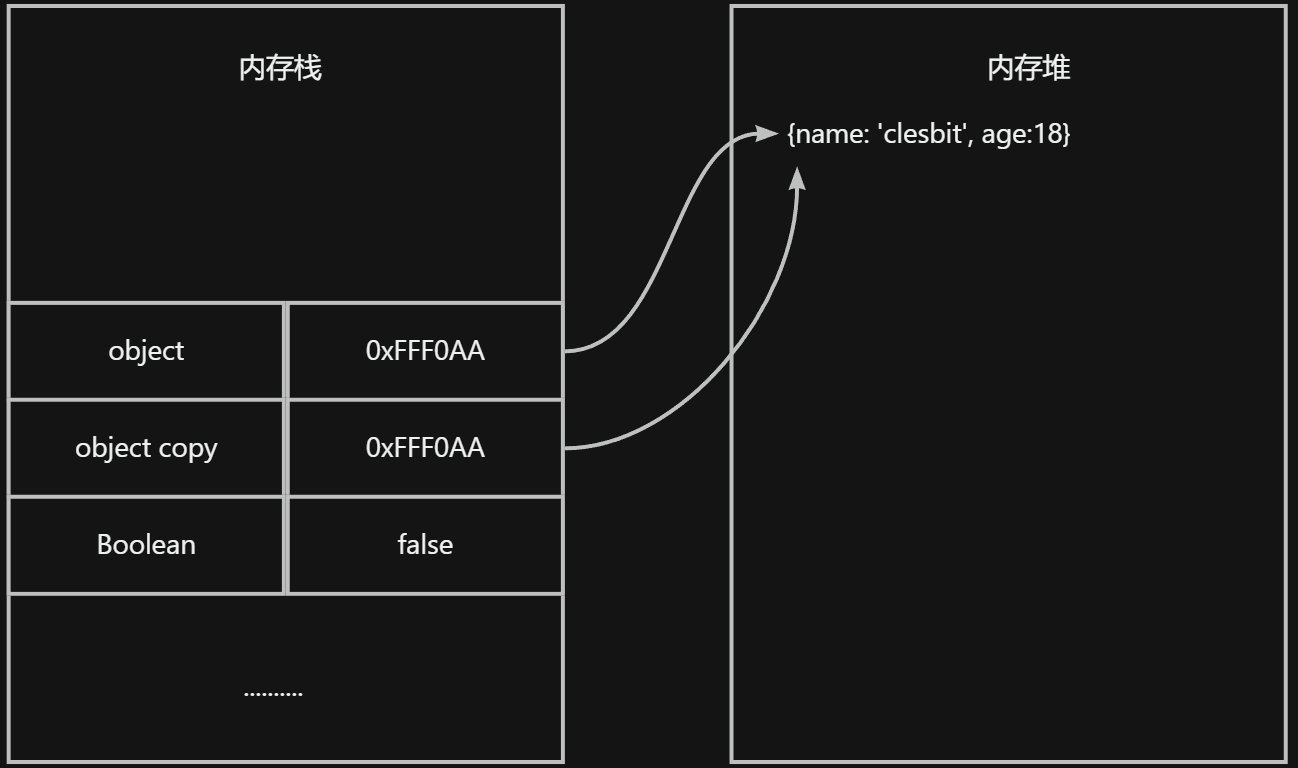
代码

1
2
3
4
5
6
7
8
9
10
11
12
const person1 = {
name: 'clesbit',
age: 21,
school: {
name: 'jsu'
}
}
const person2 = person1
person2.age = 22 //改变person2的age的值
person2.name = 'bit' // 改变person2的name的值
console.log(person1 === person2) // true
console.log(person1)

浅拷贝

理解:

  • 直接赋值是直接将内存栈中的该对象的引用地址赋给了新的变量,当使用这个新的引用修改对象的属性的时候,会影响到之前指向这个对象的引用
  • 首先,如果对象不存在嵌套属性和方法的情况下,浅拷贝是不会产生影响的,如果存在嵌套属性或者方法,实际上浅拷贝还是拷贝的引用地址。

对于一个对象,也就是引用类型进行拷贝的时候,很容易的想到一个最基本的拷贝方法,赋值运算符,比如说现在有一个对象obj
,我们可以通过es6的展开运算符对其进行拷贝const objCopy = {...obj}

1
2
3
4
5
const obj = {
name: 'clesbit'
}
const objCopy = {...obj}
console.log(obj === objCopy) //false

控制台输出的会是false,因为这样拷贝相当于创建了一个新的内存空间。
然后也可以使用Object.assign(拷贝对象,被拷贝对象)这个api进行浅拷贝

1
2
3
4
5
6
const obj = {
name: 'clesbit'
}
const objCopy = {}
Object.assign(objCopy, obj)
console.log(obj === objCopy) //false

深拷贝

通过递归来实现深拷贝

  • 深拷贝实现对一个对象的拷贝,修改对象的属性而不会对原对象产生影响
  • 使用递归的方式进行拷贝
  • 先数组、后对象
1
2
3
4
5
6
7
8
9
10
11
12
13
14
15
16
17
18
19
20
21
22
23
24
25
26
27
28
29
30
31
32
33
34
35
36
const obj = {
name: 'clesbit',
age: 18,
hobby: ['滑板', '打游戏'],
family: {
dad: 'qsj',
mom: 'lpx'
}
}
const objCopy = {}

function deepCopy(newObj, oldObj) {
/**
* 注意这个是简易版的,还有其它的没有考虑完全
* 拷贝数组和对象的顺序不能颠倒,因为数组也是属于对象的
*/
for (let k in oldObj) {
// 判断是否是数组
if (oldObj[k] instanceof Array) {
newObj[k] = []
deepCopy(newObj[k], oldObj[k])
// 判断是否是对象
} else if (oldObj[k] instanceof Object) {
newObj[k] = {}
deepCopy(newObj[k], oldObj[k])
} else {
newObj[k] = oldObj[k]
}
}
}

deepCopy(objCopy, obj)
objCopy.hobby.pop()
objCopy.family.dad = 'null'
console.log(obj)
console.log(objCopy)

lodash/cloneDeep

1
2
3
4
5
6
7
8
9
10
11
12
13
14
15
<script src="https://cdn.bootcdn.net/ajax/libs/lodash.js/4.17.21/lodash.min.js"></script>
const obj = {
name: 'clesbit',
age: 18,
hobby: ['滑板', '打游戏'],
family: {
dad: 'qsj',
mom: 'lpx'
}
}
const objCopy = _.cloneDeep(obj)
console.log(objCopy === obj) //false
objCopy.hobby.push('睡觉')
console.log(obj)
console.log(objCopy)

JSON的API实现

这个应该是最常用的一个方法了,而且也是最简单的方法

1
2
3
4
5
6
7
8
9
10
11
12
13
14
const obj = {
name: 'clesbit',
age: 18,
hobby: ['滑板', '打游戏'],
family: {
dad: 'qsj',
mom: 'lpx'
}
}
const objCopy = JSON.parse(JSON.stringify(obj))
console.log(objCopy === obj) //false
objCopy.hobby.push('睡觉')
console.log(obj)
console.log(objCopy)

数组原型方法

Array.prototype.concat()

这个方法用于合并多个数组,并且不会改变原数组,而是返回一个新的数组

1
2
3
4
5
const arr1 = [1, 2, 3, 4]
const arr2 = ['1', '2', '3']
const arr3 = [false, undefined, true]
const resArr = arr1.concat(arr2, arr3)
console.log(resArr) // [1,2,3,4,'1','2','3',false,undefined,true]

注意:如果不传递任何参数的话,会返回这个数组对象(arr1)的浅拷贝

Array.prototype.every()

every方法接收两个参数,一个是回调函数callbackFn,另一个是thisArg,当调用every
方法的时候,会对数组中每一个元素使用这个回调函数进行检查,一旦有一个元素不通过检查,也就是回调函数没有返回true
,就会停止执行,返回一个false,第二个参数thisArg是可选的,可以用来指定回调函数中this的指向。

1
2
3
4
5
6
7
8
9
10
11
const person = {
name: 'clesbit'
}
const arr = [1, 2, 3, 4]
const res = arr.every(function (item) {
if (item < 5) {
console.log(item, this)
return true
}
}, person) // 将 this 设置为 person
console.log(res) // true

注意:回调函数一定不能是箭头函数,如果是箭头函数这里会指向window,也就是全局对象

Array.prototype.filter()

filter方法接收两个参数,一个是回调函数callbackFn,一个是thisArg(指定回调函数中this的指向),当调用filter
方法的时候,会对数组中每一个元素使用这个回调函数进行过滤,如果通过了过滤,则将这个元素的浅拷贝放入新的list
当中,如果都没有通过过滤,filter方法会返回一个空的list
注意浅拷贝这个很重要,在vue3里面,对一个响应式数据使用filter方法的时候,操作不当的话响应式的特性会丢失。

1
2
3
4
5
6
7
8
9
10
11
12
const person = {
name: 'clesbit'
}
const arr = [1, 2, 3, 4]
const res = arr.filter(function (item) {
console.log(item, this)
if (item < 3) {
console.log(item, this)
return item
}
}, person) // 将 this 设置为 person
console.log(res) // [1,2]

Array.prototype.find()

find方法也是接收两个参数,一个是callbackFn回调函数,一个thisArg,指定回调函数中this的指向,当调用find
方法的时候,会为数组中的元素依次执行回调函数,find方法会匹配第一个符合条件的元素,并且返回一个真值(即所有除 false
0-00n""nullundefinedNaN 以外的皆为真值),如果没有匹配的,将会返回一个undefined
比如说,要查找一个对象数组中name是’clesbit’的对象

1
2
3
4
5
6
7
8
9
10
11
const inventory = [
{name: "apples", quantity: 2},
{name: "clesbit", quantity: 0},
{name: "cherries", quantity: 5},
{name: "clesbit", quantity: 10}
]

const result = inventory.find(({name}) => name === "clesbit")

console.log(result) // { name: "clesbit", quantity:0 }

一个值得注意的事情,看下面的代码

1
2
3
4
5
const array1 = [5, , , 12, 8, 130, 44]
const found = array1.find((element) => {
if (element > 11) return true
})
console.log(found)

最后输出的是12,不是true

Array.prototype.findIndex()

返回匹配的第一个元素的索引(index),如果没有匹配的则返回-1,工作原理和find是一样的

Array.prototype.flat()

数组解嵌套,并且删除空槽

1
2
const arr = [1, 1, , , ['666', 'cles', '', 'bit']]
console.log(arr.flat(Infinity)) // [1,1,'666','cles','','bit']

Array.prototype.forEach()

forEach方法是平时最常用的一个遍历数组的方法,接收两个参数,一个是回调函数callbackFn,另一个还是thisArg,它总是返回一个
undefined,这说明了forEach方法不支持链式调用
还有一些比较值得注意的地方:

  • 除非抛出异常,没有办法中断forEach循环
  • forEach期待的回调函数应该是一个同步函数,它不会等待Promise的兑现,所以在使用Promise(或者异步函数)作为forEach
    的回调的时候,要格外的注意这一点
1
2
3
4
5
6
7
8
9
const ratings = [5, 4, 5]
let sum = 0
const sumFunction = async (a, b) => a + b;
ratings.forEach(async (rating) => {
sum = await sumFunction(sum, rating)
});
console.log(sum)
// 期望的输出:14
// 实际的输出:0

Array.prototype.includes()

includes方法是用于判断一个数组是否包含一个指定的值,如果包含就返回true,不包含就返回false

1
2
const pets = ['cat', 'dog', 'bat']
console.log(pets.includes('cat')) // true

Array.prototype.indexOf()

学习到这里,我有点犯迷糊,这个和之前findIndex方法有什么区别,前不久才整理复习的。
首先findIndex接收的参数和indexOf不一样,findIndex接收的是一个回调函数,返回符合条件的元素的下标,indexOf
接收的是一个元素值作为参数,相同的地方是,如果都没有元素满足条件,返回的都是-1
而且indexOf会跳过数组中的空位,findIndex不会0.

1
2
3
4
5
6
7
8
9
const arr = [1, 2, 3, , 5]
const Iindex = arr.findIndex((item) => {
console.log(item)
return item === undefined
})
// 1 2 3 undefined 5
console.log(arr)
const Oindex = arr.indexOf(undefined)
console.log(Iindex, Oindex) // 3 -1

Array.prototype.join()

join方法会将数组中每一个元素连接成一个字符串,并且返回这个字符串,可以指定分隔符,默认是’,
可以在join([指定分隔符])
需要注意的是,join会把数组中的空槽视为undefined,并且也会产生一个分隔符

1
console.log([1, , 3].join()); // '1,,3'

Array.prototype.map()

map方法也是一个很常用的遍历数组的方法,它可以接受两个参数,一个是回调函数callbackFn,一个是thisArg
,返回值是一个新的数组,如果数组中存在空槽,循环过程中会忽略空槽,不会触发回调

1
2
3
4
5
6
7
8
9
/**
* map方法用于遍历数组,会对每一个数组元素调用一次回调函数
* 其返回值会构成一个新的数组
*/
const arr = [112, 5, 4, 8, 9]
const res = arr.map((item, index) => {
if (item % 2 === 0) return item
})
console.log(res) // [112,undefined,4,8,undefined]

Array.prototype.pop()

pop方法不接受任何参数,它的作用是删除数组的最后一个元素(此方法会改变数组的长度),并且将其返回,如果数组为空则会返回
undefined,值得注意的是,pop方法不会跳过空槽,遇到空槽返回的也是undefined

1
2
const arr = [18, false, 1, ,]
console.log(arr.pop(), arr.pop()) // undefined 1

Array.prototype.push()

push方法接受1个到n个参数,并且会将传入的参数添加到原数组末尾(此方法会改变原数组的长度),并且返回数组长度的值。值得注意的是,
push也不会跳过空槽。

1
2
3
4
const arr = [18, false, , 1, ,]
const sports = ['basketball', 'football', 'pingpong', ,]
console.log(arr.pop(), arr.pop()) // undefined 1
console.log(arr.push(...sports)) // 7

Array.prototype.reduce()

reduce方法接受两个参数,第一个参数是回调函数callbackFn,第二个参数是计算的初始值,如果不传,reduce会将数组的第1个元素作为初始值。
一个比较简单的用法,累加器

1
2
3
const arr = [1, 2, 3, 4, 5, 6]
const res = arr.reduce((sum, current) => sum + current, 0)
console.log(res) // 21

它是这么运行的,这里指定了第2个参数的初始值是0
,所以第一次迭代的时候sum是0,current是1,返回值是1,每次迭代的返回值会作为第二次迭代时sum的初始值,所以第二次迭代的时候sum是1,current是2,返回值是3……..
一个比较值得注意的点:回调函数中this的指向,在非严格模式下,回调函数中的this是指向全局对象的,在浏览器中也就是window
,严格模式下始终指向undefined

阶段性学习总结

慢慢学习到这里,这篇文档已经有5000字了,突然想起了前些天面试官问我的findmapfilter方法的区别,我想现在已经能说的清清楚楚了。

  1. 先来说说他们三个相同的地方,三个方法都可以接受两个参数,第一个参数是回调函数,第二个是一个可选参数,thisArg,用于指定回调函数中this的值
  2. 再说说不同点,他们的返回值是不一样的。find方法会返回数组中第一个符合条件的元素,如果没有符合条件的,则会返回undefined,map方法会对数组中每一个元素都执行一次回调函数,返回的值由回调函数来决定,并且会创建一个新的数组。新的数组长度是和原数组长度是一致的。filter方法也会创建一个新的数组,也会对每一个数组元素执行一次回调函数,符合条件的元素将会(
    浅拷贝形式)保存到新的数组当中,如果没有元素符合,则会返回一个空的数组

而且也能回答浅拷贝和深拷贝的区别了
涉及到浅拷贝和深拷贝,就得理解js中的数据类型是怎么存储的,js中有基本数据类型和引用数据类型,其中基本数据类型是因为所占空间是固定的,存储再内存栈当中,引用数据类型因为其所占空间大小是动态变化的,所以存储再内存堆当中。当我们对一个对象进行浅拷贝的时候,可以使用Object.assign([newObject],[oldObject])
这个内置的api,还有展开运算符。浅拷贝的特点是仅仅是拷贝被拷贝对象的第一层属性,如果背拷贝对象的某个属性是引用数据类型的话,实际上还是拷贝的这个属性的引用地址,当我们修改这个属性的时候,旧的对象会被一同影响。所以要想真真正正完全拷贝一个对象有以下三种方式:

  1. 使用循环递归
  2. 第三方模块lodash的deepClone方法
  3. 最后一个就是JSON.parse(JSON.stringify(被拷贝对象)),但是这个解决方案存在一定的局限性,比如说如果该对象存在方法这种引用类型。所以还需要根据实际情况去选择合适的拷贝方法